You can use the included Javascript library to build your own interface.
Example
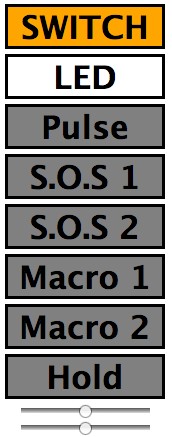
This example displays big buttons arranged in a column. It also changes the background color of the GPIO 7 for both low and high states.
<!DOCTYPE html PUBLIC "-//W3C//DTD HTML 4.01 Transitional//EN" "https://www.w3.org/TR/html4/loose.dtd">
<html>
<head>
    <meta http-equiv="Content-Type" content="text/html; charset=UTF-8">
    <meta name="viewport" content = "height = device-height, width = 420, user-scalable = no" />
    <title>WebIOPi | Demo</title>
    <script type="text/javascript" src="/webiopi.js"></script>
    <script type="text/javascript">
    webiopi().ready(function() {
        var content, button;
        content = $("#content");

        // create a "SWITCH" labeled button for GPIO 0
        button = webiopi().createGPIOButton(0, "SWITCH");
        content.append(button); // append button to content div

        // create a "LED" labeled button for GPIO 7
        button = webiopi().createGPIOButton(7, "LED");
        content.append(button); // append button to content div

        // create a button that output a single pulse
        button = webiopi().createPulseButton("pulse", "Pulse", 7);
        content.append(button); // append button to content div

        // create a button which output a bit sequence on GPIO 7 with a 100ms period
        button = webiopi().createSequenceButton("sos", "S.O.S 1", 7, 100, "01010100110011001100101010");
        content.append(button); // append button to content div

        // the previous button will always output the same sequence
        // you can also create a simple button with your own function
        button = webiopi().createButton("sos2", "S.O.S 2", outputSequence);
        content.append(button); // append button to content div

        // create a button which call myMacroWithoutArgs
        button = webiopi().createMacroButton("macro", "Macro 1", "myMacroWithoutArgs");
        content.append(button); // append button to content div

        // create a button which call myMacroWithArgs with "1,2,3" as argument
        button = webiopi().createMacroButton("macro", "Macro 2", "myMacroWithArgs", [1,2,3]);
        content.append(button); // append button to content div

        // the previous button will always call myMacroWithArgs with the same "1,2,3" argument
        // you can also create a simple button with your own function
        button = webiopi().createButton("macro2", "Macro 3", callMacro);
        content.append(button); // append button to content div

        // you can also create a button which calls a different function for mouse down and up events
        button = webiopi().createButton("hold", "Hold", mousedown, mouseup);
        content.append(button);

        // Only for Chrome and Safari, create a slider that pulse out a 0-100% duty cycle ratio on GPIO 8
        button = webiopi().createRatioSlider(8);
        content.append(button);

        // Only for Chrome and Safari, create a slider that pulse out a -45 to +45° angle on GPIO 9
        button = webiopi().createAngleSlider(9);
        content.append(button);
    });

    function mousedown() {
        webiopi().digitalWrite(7, 1);
    }

    function mouseup() {
        webiopi().digitalWrite(7, 0);
    }

    function outputSequence() {
        var sequence = "01010100110011001100101010" // S.O.S. morse code or whatever you want
        // output sequence on gpio 7 with a 100ms period
        webiopi().outputSequence(7, 100, sequence, sequenceCallback);
    }

    function sequenceCallback(gpio, data) {
        alert("sequence on " + gpio + " finished with " + data);
    }

    function callMacro() {
        var args = [1,2,3] // or whatever you want
        // call myMacroWithArgs(arg)
        webiopi().callMacro("myMacroWithArgs", args, macroCallback);
    }

    function macroCallback(macro, args, data) {
        alert(macro + " returned with " + data);
    }

    </script>
    <style type="text/css">
        button {
            display: block;
            margin: 5px 5px 5px 5px;
            width: 160px;
            height: 45px;
            font-size: 24pt;
            font-weight: bold;
            color: black;
        }

        input[type="range"] {
            display: block;
            width: 160px;
            height: 45px;
        }

        #gpio7.LOW {
            background-color: White;
        }

        #gpio7.HIGH {
            background-color: Red;
        }
    </style>
</head>
<body>
    <div id="content" align="center"></div>
</body>
</html>
Function details
webiopi()
Returns the WebIOPi object instance.
WebIOPi.ready(callback)
Register the function to call when WebIOPi is ready.
- (function) callback : function to call
WebIOPi.setFunction(gpio, func[, callback])
Set the function on the GPIO.
- (int) gpio : GPIO number from 0 to 53
- (string) func : "IN" or "OUT" or "PWM"
- (function) callback (optional) : function called when result received from the server
WebIOPi.digitalWrite(gpio, value[, callback])
Set the output value of a GPIO.
- (int) gpio : GPIO number from 0 to 53
- (int) value : 0 or 1
- (function) callback (optional) : function called when result received from the server
WebIOPi.digitalRead(gpio[, callback])
Read the value of a GPIO.
- (int) gpio : GPIO number from 0 to 53
- (function) callback (optional) : function called when result received from the server
WebIOPi.toggleValue(gpio)
Toggle value of a GPIO.
- (int) gpio : GPIO number from 0 to 53
WebIOPi.callMacro(macro, [args[, callback]])
Call a macro on the server.
- (string) macro : name of the macro to call
- (string) arg (optional) : array containing arguments
- (function) callback (optional) : function called when result received from the server
WebIOPi.outputSequence(gpio, period, sequence[, callback])
Output a bit sequence on a GPIO.
- (int) gpio : GPIO number from 0 to 53
- (int) period : time in ms between each bit
- (string) sequence : bit sequence
- (function) callback (optional) : function called when result received from the server
WebIOPi.pulse(gpio[, callback])
Output a single pulse on a GPIO.
- (int) gpio : GPIO number from 0 to 53
- (function) callback (optional) : function called when result received from the server
WebIOPi.pulseRatio(gpio, ratio[, callback])
Output a PWM duty cycle ratio on a GPIO.
- (int) gpio : GPIO number from 0 to 53
- (float) ratio : duty cycle from 0.0 to 1.0
- (function) callback (optional) : function called when result received from the server
WebIOPi.pulseAngle(gpio, angle[, callback])
Output a PWM angle on a GPIO.
- (int) gpio : GPIO number from 0 to 53
- (int) angle : angle in degree from -45 to +45
- (function) callback (optional) : function called when result received from the server
WebIOPi.createButton(id, label[, mousedown[, mouseup]])
Returns a simple button without predefined behavior.
- (string) id : id of the button to create
- (string) label : label of the button
- (function) mousedown (optional) : function called on mousedown/click event
- (function) mouseup (optional) : function called on mouseup event
WebIOPi.createFunctionButton(gpio)
Returns a button that change the function of a GPIO.
- (int) gpio : GPIO number from 0 to 53
WebIOPi.createGPIOButton(gpio, label)
Returns a button that change the state of a GPIO at each click.
- (int) gpio : GPIO number from 0 to 53
- (string) label : label of the button
WebIOPi.createMacroButton(id, label, macro, args)
Returns a button that call a macro on the server.
- (string) id : id of the button to create
- (string) label : label of the button
- (string) macro : name of the macro to call
- (string) args : string arguments
WebIOPi.createSequenceButton(id, label, gpio, period, sequence)
Returns a button that output a bit sequence on a GPIO.
- (string) id : id of the button to create
- (string) label : label of the button
- (int) gpio : GPIO number from 0 to 53
- (int) period : time in ms between each bit
- (string) sequence : bit sequence
WebIOPi.createRatioSlider(gpio, ratio)
Returns a slider that send its value as a PWM duty cycle ratio
- (int) gpio : GPIO number from 0 to 53
- (float) ratio : slider's init value
WebIOPi.createAngleSlider(gpio, angle)
Returns a slider that send its value as a PWM angle
- (int) gpio : GPIO number from 0 to 53
- (int) angle : slider's init value
WebIOPi.setLabel(id, label)
Change a label of given button.
- (string) id : id of the button to change
- (string) label : new label of the button