Tutorial : Framework basis
Light Control with auto on/off
Making an IoT application using WebIOPi is very easy once we catch how it works and what is necessary.
WebIOPi includes an HTTP server that provides both HTML resources and a REST API to control things. Your browser will first load a HTML file, then the included Javascript will make Asynchronous calls to the REST API to control and update the UI. This method is very efficient, because it don't need to refresh and download the whole page.
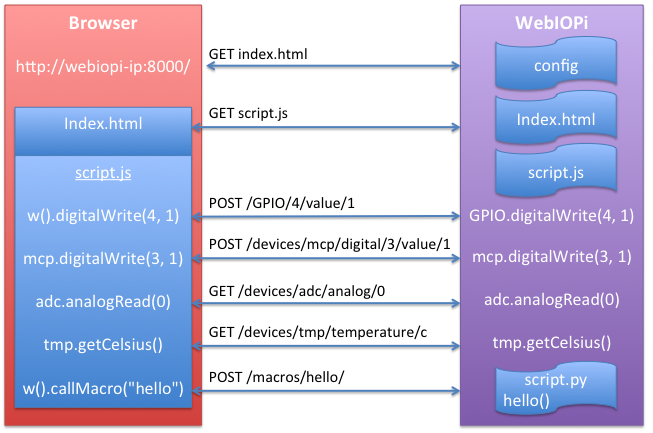
- You can build your HTML / Web UI from scratch, using the WebIOPi JS library or not.
- You can extend the WebIOPi behavior by loading custom Python script using an Arduino like syntax with setup/loop functions
Assume we simply want a button to control a light, which will be automatically turned on and off. I say a light, but it can be a anything you want. The customization process has 3 steps :
- Write a simple Python script to initialize the GPIO and handle auto on/off
- Write a simple HTML/Javascript page
- Configure WebIOPi Server
Prerequisites
- If not already done, install WebIOPi on your Raspberry Pi.
- Create a folder somewhere on your Pi, for instance /home/pi/myproject. This is the main folder.
- Create another python folder in the folder previously created. We will store Python script file here.
- Create another html folder next to python. We will store HTML and other ressources here.
You should have something like this :
home
- pi
  - myproject
    - python
    - html
Python script
Create a script.py file in your python folder, eg. /home/pi/myproject/python/script.py. This file will be loaded and executed by the WebIOPi server.
import webiopi
import datetime

GPIO = webiopi.GPIO

LIGHT = 17 # GPIO pin using BCM numbering

HOUR_ON  = 8  # Turn Light ON at 08:00
HOUR_OFF = 18 # Turn Light OFF at 18:00

# setup function is automatically called at WebIOPi startup
def setup():
    # set the GPIO used by the light to output
    GPIO.setFunction(LIGHT, GPIO.OUT)

    # retrieve current datetime
    now = datetime.datetime.now()

    # test if we are between ON time and tun the light ON
    if ((now.hour >= HOUR_ON) and (now.hour < HOUR_OFF)):
        GPIO.digitalWrite(LIGHT, GPIO.HIGH)

# loop function is repeatedly called by WebIOPi
def loop():
    # retrieve current datetime
    now = datetime.datetime.now()

    # toggle light ON all days at the correct time
    if ((now.hour == HOUR_ON) and (now.minute == 0) and (now.second == 0)):
        if (GPIO.digitalRead(LIGHT) == GPIO.LOW):
            GPIO.digitalWrite(LIGHT, GPIO.HIGH)

    # toggle light OFF
    if ((now.hour == HOUR_OFF) and (now.minute == 0) and (now.second == 0)):
        if (GPIO.digitalRead(LIGHT) == GPIO.HIGH):
            GPIO.digitalWrite(LIGHT, GPIO.LOW)

    # gives CPU some time before looping again
    webiopi.sleep(1)

# destroy function is called at WebIOPi shutdown
def destroy():
    GPIO.digitalWrite(LIGHT, GPIO.LOW)
That's it ! No HTTP boring stuff. The file will be loaded by the WebIOPi server which already handle remote control.
HTML/Javascript
Create a index.html file in your
html folder, eg.
/home/pi/myproject/html/index.html. The WebIOPi
Javascript library allows you to make your own interface easily with
buttons bound to GPIO. You only need a single
<script> tag to include /webiopi.js.
It will then automatically load jQuery, a nice JS library.
You don't need to put webiopi.js and jquery.js in your project
html folder. You just need the <script> tag in your
index.html. The WebIOPi server filters browsers requests to serves
both webiopi.js and jquery.js files from the default WebIOPi resource
folder.
The index.html is composed of few HTML tags, including a little
Javascript part and few CSS lines. The most important to take care about
is the anonymous Javascript function passed to WebIOPi JS library with
webiopi().ready(). This ensure WebIOPi and jQuery
libraries are loaded before modifying the UI. Also take take of the
parenthesis when prefixing functions calls with
webiopi(). After the button creation, we use a jQuery
function to append it to a HTML element, declared later in the
<body> tag.
<!DOCTYPE html PUBLIC "-//W3C//DTD HTML 4.01 Transitional//EN" "https://www.w3.org/TR/html4/loose.dtd">
<html>
<head>
<meta http-equiv="Content-Type" content="text/html; charset=UTF-8">
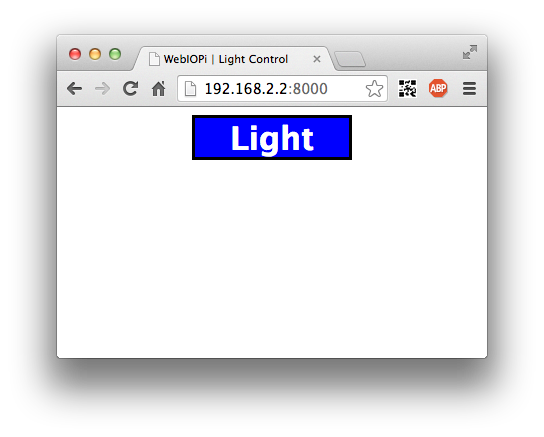
<title>WebIOPi | Light Control</title>
<script type="text/javascript" src="/webiopi.js"></script>
<script type="text/javascript">
webiopi().ready(function() {
// Create a "Light" labeled button for GPIO 17
var button = webiopi().createGPIOButton(17, "Light");
// Append button to HTML element with ID="controls" using jQuery
$("#controls").append(button);
// Refresh GPIO buttons
// pass true to refresh repeatedly of false to refresh once
webiopi().refreshGPIO(true);
});
</script>
<style type="text/css">
button {
display: block;
margin: 5px 5px 5px 5px;
width: 160px;
height: 45px;
font-size: 24pt;
font-weight: bold;
color: white;
}
#gpio17.LOW {
background-color: Black;
}
#gpio17.HIGH {
background-color: Blue;
}
</style>
</head>
<body>
<div id="controls" align="center"></div>
</body>
</html>Configuration
Edit /etc/webiopi/config :
-
Locate
[SCRIPTS]section, add following line to load your Python script
...
[SCRIPTS]
myproject = /home/pi/myproject/python/script.py
...-
Locate
[HTTP]section, add following line to tell WebIOPi where to find your HTML resources
...
[HTTP]
doc-root = /home/pi/myproject/html
...
The two steps above are enough to run our app, but we want to limit remote control to the Light only. By default, we can remotely change function and value of all GPIO.
-
Locate
[REST]section, add following lines
...
[REST]
gpio-export = 17
gpio-post-value = true
gpio-post-function = false
...- gpio-export limits GPIO exported on the REST API (using BCM numbering)
- gpio-post-value allows/forbids to remotely change GPIO values (LOW/HIGH)
- gpio-post-function allows/forbids to remotely change GPIO function (IN/OUT)
Testing
To debug your script and config, you should first run WebIOPi foreground before using the daemon service :
sudo webiopi -d -c /etc/webiopi/configYou can now open your browser to your Raspberry Pi IP at port 8000 (https://raspberrypi:8000/) and control a light/led connected to GPIO 17.
You can then follow the tutorial on macros to learn how to remotely change on and off hours.