Tutorial : Using devices
Programmable Heater with Temperature Sensor and GPIO Expander
WebIOPi include several drivers to directly control over 30 electronic devices. It provides a consistent and common abstraction for most used sensors, analog converters, and GPIO expanders. See the supported devices pages for a complete listing.
All supported devices can be used in your Python script, from the REST API, the Javascript library, or even from the Python or Java Client. Function provided depend on the devices type. Devices can support one or multiples interfaces. Interfaces are grouped in 3 packages :
-
Digital
- GPIOPort (I/O Expanders)
-
Analog
- ADC (Analog to Digital Converter, ie. analog inputs)
- DAC (Digital to Analog Converter, ie. analog outputs)
- PWM (Pulse Width Modulation outputs)
-
Sensor
- Temperature
- Pressure
- Luminosity
- Distance
Prerequisites
-
WebIOPi installed on your Raspberry
- Follow Install Tutorial
-
Know WebIOPi framework basis, and how to launch WebIOPi foreground
(debug)
- Follow Framework Basis Tutorial
-
Know how to write and use macros
- Follow Using Macros Tutorial
- A supported Temperature sensor
- A supported GPIO expander
-
Know how to wire components on the Raspberry Pi
- Google about it. There is plenty example on Internet.
- Check Hacker Tips
Testing Devices
Before using devices in your Pythons script or custom UI, you may need to debug your circuitry and at least, verify it works well with the WebIOPi environment. You don't need to write any line of code to test your devices, thanks to the WebIOPi configuration file.
WebIOPi handles by itself linux modules loading to support I2C, SPI, and 1-Wire. But it only works if you do not use any other GPIO library. I suggest to reboot your Pi at this time.
Edit /etc/webiopi/config.
Assume we have a TMP102 I2C Temperature
sensor, simply add following line in the
[DEVICES] section to register it with the
name tmp. This name will be used to identify the sensor
in the whole system. I say a TMP102, but it can be any Temperature
sensor supported by WebIOPi. Except from the config syntax, they all
have the same functions.
[DEVICES]
tmp = TMP102
Assume we also have a MCP23017 I2C GPIO Expander, then we can also add the optional I2C slave address. Again, I say a MCP23017, but it can be any GPIO expander supported. Just adapt the config line to your chipset, the rest of the tutorial remains unchanged.
[DEVICES]
tmp = TMP102
mcp = MCP23017 slave:0x20
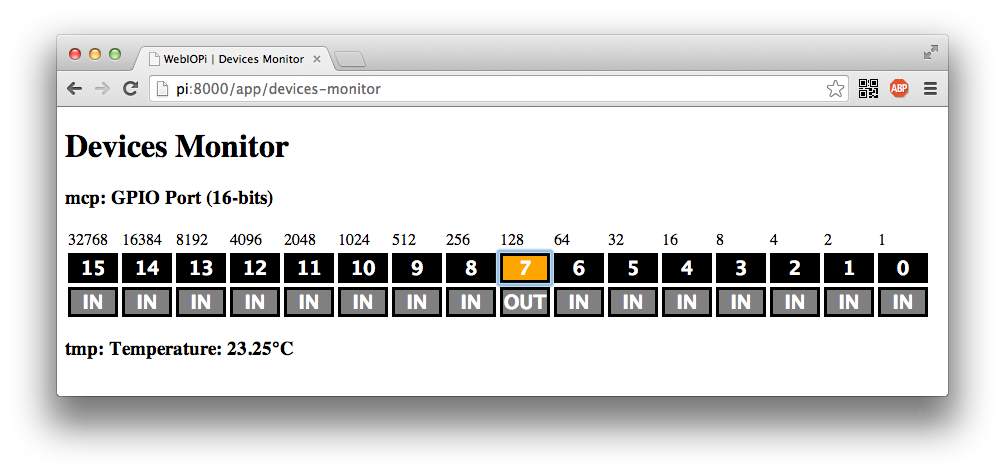
Ensure you don't have any doc-root directive in the
[HTTP] section to use defaults web apps,
save, and restart webiopi to use the device monitor (https://raspberrypi:8000/app/devices-monitor/).
Devices in Python scripts with REST mapping
When devices are named in the configuration file, drivers are automatically called to initialize the device and mapped to the REST API. We need to use the webiopi.deviceInstance(name) function in the Python script to retrieve the device object instance for the given name. Then we can use functions of the drivers, depending of interfaces supported. You will find a link to all interfaces supported with a complete function list on the top of each device wiki pages. See TMP102 and MCP230xx for instance.
The following example automatically turns on/off the heater, plugged on a GPIO expander, depending on the temperature given by a the sensor. There is also a main AUTO flag to allow forcing the heater.
import webiopi
GPIO = webiopi.GPIO # Helper for LOW/HIGH values
HEATER = 7 # Heater plugged on the Expander Pin 7
MIN = 22 # Minimum temperature in celsius
MAX = 24 # Maximum temperature in celsius
AUTO = True

# setup function is automatically called at WebIOPi startup
def setup():
    mcp = webiopi.deviceInstance("mcp") # retrieve the device named "mcp" in the configuration
    mcp.setFunction(HEATER, GPIO.OUT)

# loop function is repeatedly called by WebIOPi
def loop():
    if (AUTO):
        tmp = webiopi.deviceInstance("tmp") # retrieve the device named "tmp" in the configuration
        mcp = webiopi.deviceInstance("mcp") # retrieve the device named "mcp" in the configuration

        celsius = tmp.getCelsius() # retrieve current temperature
        print("Temperature: %f" % celsius)

        # Turn ON heater when passing below the minimum temperature
        if (celsius < MIN):
            mcp.digitalWrite(HEATER, GPIO.HIGH)

        # Turn OFF heater when reaching maximum temperature
        if (celsius >= MAX):
            mcp.digitalWrite(HEATER, GPIO.LOW)

    # gives CPU some time before looping again
    webiopi.sleep(1)

# destroy function is called at WebIOPi shutdown
def destroy():
    mcp = webiopi.deviceInstance("mcp") # retrieve the device named "mcp" in the configuration
    mcp.digitalWrite(HEATER, GPIO.LOW) # turn off to avoid over heating

# a simple macro to return heater mode
@webiopi.macro
def getMode():
    if (AUTO):
        return "auto"
    return "manual"

# simple macro to set and return heater mode
@webiopi.macro
def setMode(mode):
    global AUTO
    if (mode == "auto"):
        AUTO = True
    elif (mode == "manual"):
        AUTO = False
    return getMode()
Javascript Library
If you set the device in the configuration file, all functions from the driver are bound to the REST API. Most of them are also available directly in the Javascript library. Simply pass the configured name for the device to the Javascript constructor.
First, edit your index.html file to write your HTML structure. Don't
forget to add a <script> tag to include
/webiopi.js, the <body> contains
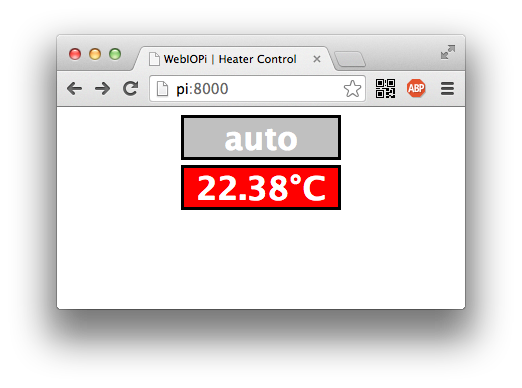
twos <button>. The first button will be used to
change the heater mode (auto/manual). The second button will display the
temperature and controls the heater. There is also few CSS rules to
setup buttons and define two CSS classes.
<!DOCTYPE html PUBLIC "-//W3C//DTD HTML 4.01 Transitional//EN" "https://www.w3.org/TR/html4/loose.dtd">
<html>
<head>
    <meta http-equiv="Content-Type" content="text/html; charset=UTF-8">
    <title>WebIOPi | Light Control</title>
    <script type="text/javascript" src="/webiopi.js"></script>

        <style type="text/css">
                button {
                        display: block;
                        margin: 5px 5px 5px 5px;
                        width: 160px;
                        height: 45px;
                        font-size: 24pt;
                        font-weight: bold;
                        color: white;
                }

                button.OFF {
                        background-color: Black;
                }

                button.ON {
                        background-color: Red;
                }
        </style>
</head>
<body>
    <div align="center">
    <button id="bt_mode" onclick="toggleMode()"/><br>
        <button id="bt_heater" onclick="toggleHeater()"/>
    </div>
</body>
</html>
We can then add an important Javascript part to glue the buttons to the WebIOPi REST API.
<!DOCTYPE html PUBLIC "-//W3C//DTD HTML 4.01 Transitional//EN" "https://www.w3.org/TR/html4/loose.dtd">
<html>
<head>
    <meta http-equiv="Content-Type" content="text/html; charset=UTF-8">
    <title>WebIOPi | Heater Control</title>
    <script type="text/javascript" src="/webiopi.js"></script>

    <script type="text/javascript">
    // declare few global variables
    var tmp;
    var mcp;
    var heater = 7;

        webiopi().ready(init);

    // defines function passed to webiopi().ready()
    function init() {
        // setup helpers to remotely control devices
        tmp = new Temperature("tmp");
        mcp = new GPIOPort("mcp");
        // automatically refresh UI each seconds
        setInterval(updateUI, 1000);
    }

    // function called through setInterval
    function updateUI() {
        // call Temperature.getCelsius REST API
        // result is asynchronously displayed using the callback
        tmp.getCelsius(temperatureCallback);

        // call MCP.digitalRead REST API
        if (mcp.isReady()) {
            mcp.digitalRead(heater, gpioPortDigitalCallback);
        }

        // call getMode macro
        webiopi().callMacro("getMode", [], modeCallback);
    }

    // callback function used to display the temperature
    function temperatureCallback(sensorName, data) {
        // jQuery functions
        $("#bt_heater").text(data + "°C");
    }

    // callback function used to display MCP digital state
    function gpioPortDigitalCallback(gpioName, channel, value) {
        // test returned value and set appropriate CSS class on the button
        if (value == "0") {
            // jQuery functions
            $("#bt_heater").attr("class", "OFF");
        }
        else if (value == "1") {
            $("#bt_heater").attr("class", "ON");
        }
    }

    // callback function used to display current heater mode
    function modeCallback(macroName, args, data) {
        $("#bt_mode").text(data);
    }

    // called by the heater button
    function toggleHeater() {
        if ($("#bt_heater").attr("class") == "OFF") {
            mcp.digitalWrite(heater, 1, gpioPortDigitalCallback);
        }
        else if ($("#bt_heater").attr("class") == "ON") {
            mcp.digitalWrite(heater, 0, gpioPortDigitalCallback);
        }
    }

    // called by the mode button
    function toggleMode() {
        if ($("#bt_mode").text() == "auto") {
            webiopi().callMacro("setMode", "manual", modeCallback);
        }
        else if ($("#bt_mode").text() == "manual") {
            webiopi().callMacro("setMode", "auto", modeCallback);
        }
    }
   </script>
Don't forget to define your script and change the doc-root setting in /etc/webiopi/config then start webiopi foreground. This example provide fixed temperature min/max, but you can mix this tutorial with the macro tutorial to add few more controls.
Devices in Python scripts without REST mapping
If you don't need or don't want your devices to be bound to the REST API, you can avoid setting them in the configuration file and initialize the driver by yourself. You will just need to import the driver from the correct package. You can also use the whole library in your own Python script, without the WebIOPi HTTP server.
For instance, with our TMP102 and MCP23017 :
import webiopi

# load drivers
from webiopi.devices.sensor import TMP102
from webiopi.devices.digital import MCP23017

GPIO = webiopi.GPIO # Helper for LOW/HIGH values
HEATER = 0 # Heater plugged on the Expander Pin 0
MIN = 20 # Minimum temperature in celsius
MAX = 22 # Maximum temperature in celsius

# initialize drivers
tmp = TMP102()
mcp = MCP23017(slave=0x20)

# setup function is automatically called at WebIOPi startup
def setup():
    mcp.setFunction(HEATER, GPIO.OUT)

# loop function is repeatedly called by WebIOPi
def loop():
    celsius = tmp.getCelsius() # retrieve current temperature

    # Turn ON heater when passing below the minimum temperature
    if (celsius < MIN):
        mcp.digitalWrite(HEATER, GPIO.HIGH)

    # Turn OFF heater when reaching maximum temperature
    if (celsius >= MAX):
        mcp.digitalWrite(HEATER, GPIO.LOW)

    # gives CPU some time before looping again
    webiopi.sleep(1)

# destroy function is called at WebIOPi shutdown
def destroy():
    mcp.digitalWrite(HEATER, GPIO.LOW) # turn off to avoid over heating